
WEB ADI
- Step 1
·
First,
we need to set profile option is set to Yes!
·
BNE
Allow No Security Rule – YES
·
Navigation
➔
System Administration ➔
Profile ➔
System
·
Give
Profile Name as BNE Allow No Security Rule and click on Find
· Change the Site level permission to YES

- Step 2
Next, we
need to enable macros for the Excel
Go to Excel
➔
open Options ➔
Trust Center ➔
Trust Center Settings

In the
Macro Settings
Enable all macros
In the
developer Macro Settings
Trust access to the VBA

- Step 3
Create one package and compile it.
CREATE OR REPLACE PACKAGE XX_OE_TOTALPRICE_GT_PKG
IS
PROCEDURE
XX_OE_TOTALPRICE_GT_INSERT (P_HEADER_ID
NUMBER,
P_TOTAL_PRICE NUMBER,
P_ATTRIBUTE_TYPE
VARCHAR2,
P_LAST_UPDATE DATE);
END XX_OE_TOTALPRICE_GT_PKG;
CREATE OR REPLACE PACKAGE BODY XX_OE_TOTALPRICE_GT_PKG
IS
PROCEDURE
XX_OE_TOTALPRICE_GT_INSERT (P_HEADER_ID
NUMBER,
P_TOTAL_PRICE NUMBER,
P_ATTRIBUTE_TYPE
VARCHAR2,
P_LAST_UPDATE DATE)
IS
BEGIN
INSERT INTO
XXX_OE_TOTALPRICE_GT_1
VALUES (P_HEADER_ID,
P_TOTAL_PRICE, P_ATTRIBUTE_TYPE, SYSDATE);
COMMIT;
END;
END;
- Step 4
An "Integrator" refers to a predefined set of rules and
configurations that dictate how data is mapped between Excel spreadsheets and
Oracle E-Business Suite forms. Integrators define the mapping of Excel
spreadsheet columns to specific fields in Oracle E-Business Suite forms,
ensuring accurate and seamless data transfer.
Now we need to create Integrator
Navigation: Desktop
Integration Manager ➔
Create Integrator

We will
give
·
integrator
name
·
internal
name
here internal name
should be in Upper case only
·
application
enable Display in create
document page

Click on NEXT
- Step 5
Now we
need to create an Interface
·
Interface
Name
·
Interface
Type
Based on
the Interface type other options will Appear
Ex: Interface Type = API –
Procedure
·
Package
Name
·
Procedure/Function
Name
·
API
Returns

Click On
Apply
You will
see the message like interface created successfully.
After
creating Interface, when we select the interface by checking the check box at
extreme left
Which are
the parameters present in the procedure/ package, those parameters will
automatically Appear.


- Step 6
Next If we
want to Retrieve data from the oracle application, we can create Contents
In this
example I am not creating any Contents.

- Step 7
Now we
need to create an Uploader
Uploader
type = from Template
Click on
Create Template
Automatically
it creates a template for upload data based on your Integrator.

- Step 8
Now we
need to create an Importer
·
Importer
type
·
Importer
name
And add PL/SQL API call

When you
click on PL/SQL API call this form will open

Click on
Apply to create Importer.

Now click
on Apply and Submit to create Integrator
If you want
to check the integrator is created or not
Navigation ➔
Desktop Integration manager ➔
manage Integrators
Give
Integrator name

- Step 9
Now we
need to create Layout
Navigation ➔
Desktop Integration ➔
define layout

Click On Go
Next
Click on Create
To
create layout
·
Layout
Name
·
Number
of headers

Click on
Next

Click On
Next

Now click
On Apply
Layout saved
successfully.

After
creating Layout, we need to define mappings
But in this
example mappings are not required
So, we can
continue with create document
Navigation:
Desktop Integrator => Create Document

Enter
your Integrator Name and Click on Go

It
will fetch the data

After
clicking Create an excel file will be downloaded.

Enter the
data According to columns

Click on
upload

Again
Upload
Confirmation
screen

Go to SQL
Developer and check the data is uploaded into your table.

If you face any issues with your EXCEL follow
the below steps.
Open Internet options

SECURITY ➔
TRUSTED SITES ➔
SITES

Add your website link
The link is https://ebsdev.mcquay.com

Now, if you want to display any
content in Excel you need to create a content
To Create content after Interfaces we
need to create content

Give
Content
Name
Content
Type = SQL query
Number of Columns = 1
Select
* from “your table name”
Click on Apply.
The
New content will create and when we click on check box at extreme left, All
columns in the table will be displayed.

After Creating the content, we need
to define mapping for this content

Click on Define Mapping
➔
Select your Integrator for creating mapping.

By
default, there is no mappings for this Integrator message is came
When
we click on Create mapping at
extreme right another page will open.
In this example I’m using already
existing mapping

Here, Number of columns is “Parameters
which you mention in your package or procedure”
I’m
using only 3 parameters in my package
Give
Mapping Name and Number of columns, then
Click On Next

Click
on LOV to get the list of columns in your content query.
In my
table, there are 4, so in the below page there are 4 columns are there.
Choose
one column and click on select

Now
we need to select the target column for the source column
Same
as Source Column, you need to select Target Column LOV

In
the Target Column LOV,
The
parameters which are you mention in your package or procedure only those
parameters will come under Target Columns LOV
In my
package, there are only 3 parameters.
Now Select the parameter according
to the Source Column and click on select

Do
this same process for all Columns.
Next,
Click on Apply

Mapping Created Successfully: - Confirmation message will come.

Now
we need to create Document.
Navigation
Desktop Integrator → Create Document
Select your Integrator and select
your Content, then
Click
on Create.
Excel
File will be downloaded.

Here
is the Excel file along with DATA

➔
When
you click on Upload, the DATA which are present in the Excel file, all the DATA is inserted into the Target table
using interface. Ex

➔
When
you Click on Download, Web ADI Excel
file is Downloaded as Normal Excel file
For
Deleting the Integrator from the Application
Navigation ➔
Desktop Integrator
Manager

Query with Integrator Name
Click on Delete Icon

Confirmation Message


Checking from Back-end using SQL Developer
SELECT
* FROM BNE_INTEGRATORS_B WHERE
UPLOAD_PARAM_LIST_CODE like 'XX_TOTAL%';
SELECT * FROM BNE_INTEGRATORS_VL WHERE UPLOAD_PARAM_LIST_CODE like 'XX_TOTAL%';
SELECT * FROM BNE_LAYOUTS_VL WHERE LAYOUT_CODE like 'XX_TOTAL%';
SELECT * FROM BNE_MAPPINGS_VL WHERE INTEGRATOR_CODE like 'XX_TOTAL%';
=>LOV
based Web ADI
List LOV
In this example, I want to display types of currencies exists
in the FND_CURRENCIES in the place of P_INV_ CURRENCY

When we click on Update icon for P_INV_CURRENCY, below pop-up
window will open.

Here, Validation Type = Table, I’m select the values
from the table.
Id column is usually representing a unique identifier or key for a particular
record in the Oracle application.
Meaning column is used to provide human-readable descriptions or labels
corresponding to the values in the Id column.
Desc Column typically provides additional details or information about
the data in the Id column.
Validation Entity is a table, enter your table name here
Where Clause is optional
LOV Type Pop List
Prompt Above The text will appear in the place of P_INV_CURRENCY
User Hint Text is type of the column (Number, Varchar2, List etc.)
Click On Apply
Changes will add to your Parameter.
For List LOV this is
enough, but if you want to create Calendar and Pop-up LOV, we
need to create components.
To create Component
Navigation à Desktop Integrator Manager à Manage Components
When you click on manage components,
below form will be open.
Calendar
type

Click on Create Component
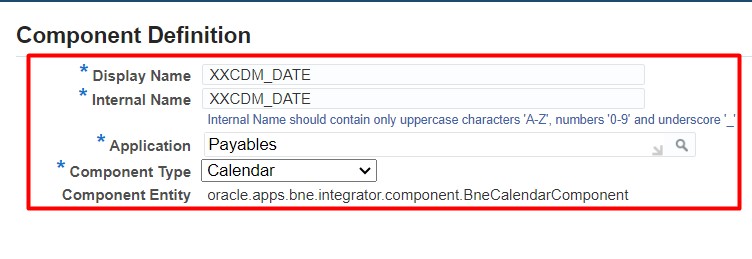
Display Name Give Name for your Component.
Internal Name Give Name for your Component. (Upper case only)
Application Give the same application name, which you given when you
create your Integrator
Component Type = Calendar
Click On Apply
When you click on apply one confirmation message will come. Next
Click on Apply

Now we need to attach this component to our Parameter at the
Interface level.

Click on Update Icon

The "Java" validation type is associated with the
use of Java-based components to handle date validations and provide a
user-friendly calendar interface within the Web ADI Excel interface.
The "Java" validation type implies that the
calendar functionality is implemented using Java components to handle the
date-related operations and interactions.
Component Name = Give your Component Name and click on
select

Click on Apply
The date component will apply for P_INV_DATE parameter.
Till this point Calendar Type is completed.
Pop-up LOV
Now I want to display supplier name and supplier number when
user click on Supplier Name column cell.
To create Component
Navigation ➔
Desktop Integrator Manager ➔
Manage Components
When you click on manage components,
below form will be open.

Click on Create Component
Display Name Give Name for your Component.
Internal Name Give Name for your Component. (Upper case only)
Application Give the same application name, which you given when you
create your Integrator
Component Type = TABLE LOV (I’m fetching Supplier details from AP_SUPPLIERS
table), That’s why I’m using TABLE LOV here.
Click On Apply

In the list of component parameters
Table-column-alias = Give Column alias
name for the table column.
Table-column-sort =
ASCENDING/DESCENDING.
Table-columns = give your column
name which you want to display in your LOV.
Table-headers = Text which you want
to display at the header level.
Table-selected-column
= For which column you want to apply the pop-up LOV
▪
Window-caption
▪
Window-height
▪
Window-width
These three are not mandatory
Give the necessary information and click on Apply. The
component will be created successfully.
Now we need to atta

this component to our parameter.
Click on Update
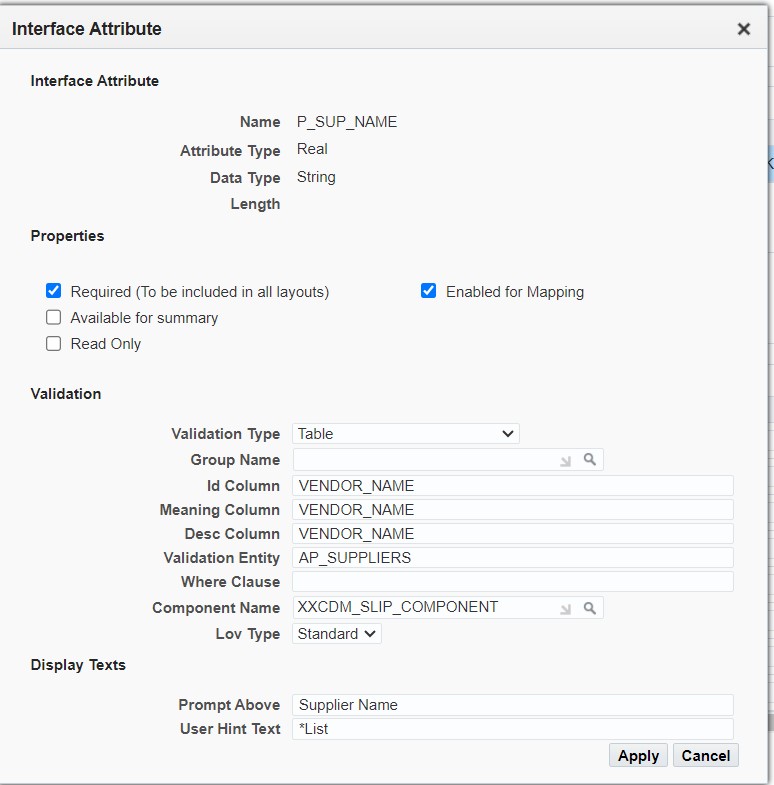
Click on Component Name and select your component name


Click on Apply to save changes.
Next, we need to create document to download Excel
Open Excel,

Here, Supplier name is Pop-Up LOV

Invoice Currency is List LOV.

Invoice date is date type.
COMPONENTS
BNE_COMPONENTS_B
BNE_COMPONENTS_TL
BNE_COMPONENTS_VL
INTEGRATORS
BNE_INTEGRATORS_B
BNE_INTEGRATORS_TL
BNE_INTEGRATORS_VL
INTERFACES
BNE_INTERFACES_B
BNE_INTERFACES_TL
BNE_INTERFACES_VL
BNE_INTERFACE_COLS_B
BNE_INTERFACE_COLS_TL
BNE_INTERFACE_COLS_VL
CONTENTS
BNE_CONTENTS_B
BNE_CONTENTS_TL
BNE_CONTENTS_VL
BNE_CONTENT_COLS_B
BNE_CONTENT_COLS_TL
BNE_CONTENT_COLS_VL
LAYOUTS
BNE_LAYOUTS_B
BNE_LAYOUTS_TL
BNE_LAYOUTS_VL
BNE_LAYOUT_COLS
BNE_LAYOUT_COLS_V
BNE_LAYOUT_LOBS
MAPPINGS
BNE_MAPPINGS_B
BNE_MAPPINGS_TL
BNE_MAPPINGS_VL
BNE_MAPPING_LINES
SQL queries to get Package and View name used in Integrator
SELECT BIT.USER_NAME WEB_ADI, BA.ATTRIBUTE2
"PACKAGE", BCT.USER_NAME "VIEW"
FROM
BNE_INTEGRATORS_TL BIT,
BNE_ATTRIBUTES BA,
BNE_CONTENTS_TL BCT
WHERE substr (BIT.INTEGRATOR_CODE,1,length(BIT.INTEGRATOR_CODE)-5)||'_P0_ATT' =
BA.ATTRIBUTE_CODE
AND
BIT.APPLICATION_ID = BCT.APPLICATION_ID
AND BIT.LANGUAGE = 'US'
AND BCT.LANGUAGE = 'US'
AND BA.ATTRIBUTE1 = 'PROCEDURE'
AND BIT.APPLICATION_ID = BA.APPLICATION_ID
AND BCT.CONTENT_CODE =
substr(BIT.INTEGRATOR_CODE,1,length(BIT.INTEGRATOR_CODE)-5)||'_CNT'
AND BIT.USER_NAME LIKE 'XX Test Create'
ORDER BY BIT.USER_NAME;
Following script
lists all the Seeded/Custom integrators available in WebADI.
SELECT ig.user_name integrator,
fa.application_name APPLICATION
FROM bne_integrators_vl ig,
fnd_application_vl fa
WHERE ig.enabled_flag = 'Y'
AND ig.application_id = fa.application_id
ORDER BY ig.application_id;
WebADI - Delete Integrator and Interface through API
Deleting interface through application and trying to create
the same name, It will not allow to recreate the same interface name, for that
we need to delete the interface through API
-- Get an Interface/Integrator Details
SELECT biv.application_id
,biv.integrator_code
,biv.user_name
,bib.interface_code
FROM
bne_integrators_vl biv
,bne_interfaces_b bib
WHERE
upper(user_name) like '%XXAK%'
AND
bib.integrator_code = biv.integrator_code ;
--Delete an Intergrator
DECLARE
vn_number number :=0;
BEGIN
vn_number:= bne_integrator_utils.delete_integrator
(p_application_id => 20003,
p_integrator_code => 'XXAKTESTUPADI_XINTG');
dbms_output.put_line(' ADI Deleted : '||vn_number);
COMMIT;
--
EXCEPTION
WHEN
OTHERS THEN
DBMS_OUTPUT.put_line('Error: '||sqlerrm);
ROLLBACK;
END
/
--Delete an Interface
DECLARE
vn_number NUMBER;
BEGIN
vn_number := bne_integrator_utils.delete_interface
(p_application_id => 20003,
p_interface_code =>
'XXAKTESTUPADI_XINTG_INTF1');
DBMS_OUTPUT.put_line ('ADI Interface Deleted '||vn_number);
COMMIT;
--
EXCEPTION
WHEN
OTHERS THEN
DBMS_OUTPUT.put_line('Error: '||sqlerrm);
ROLLBACK;
END;
/


No comments:
Post a Comment